Silky Panna Cotta Recipe: Italian Elegance Made Simple


Imagine a dessert so smooth, so delicate, it melts in your mouth like a sweet, creamy dream. That's Panna Cotta, an Italian classic that's surprisingly simple to make at home. Get ready to impress your friends and family with this elegant treat!
Have you ever wanted to create a show-stopping dessert without spending hours in the kitchen? Or perhaps you've been intimidated by complicated recipes with long lists of ingredients? Maybe you’ve tried other Panna Cotta recipes that just didn’t deliver that signature silky texture, leaving you with a grainy or rubbery result. It's frustrating when you crave a sophisticated dessert but lack the time or confidence to pull it off.
This recipe for Silky Panna Cotta: Italian Elegance Made Simple is for anyone who wants to create a restaurant-quality dessert with minimal effort. Whether you're a seasoned baker or a kitchen newbie, this recipe is designed to be foolproof and deliver consistently delicious results. It's perfect for dinner parties, special occasions, or simply a delightful treat on a quiet evening.
This recipe will guide you through creating a perfectly silky Panna Cotta, demystifying the process and offering tips for achieving that signature smooth texture. We'll explore variations, serving suggestions, and the fascinating history behind this beloved Italian dessert. You'll discover that creating an elegant and impressive dessert is easier than you think!
Understanding the Gelatin's Role
The gelatin is the unsung hero of our Silky Panna Cotta recipe. I remember one time, I was rushing to prepare Panna Cotta for a friend's birthday, and I completely forgot to bloom the gelatin properly. The result? A soupy, unstable mess. It was a complete disaster! That experience taught me a valuable lesson: the gelatin is crucial for achieving that perfect, wobbly texture. When properly bloomed in cold water, the gelatin granules absorb the liquid and soften. This ensures that the gelatin dissolves evenly into the cream mixture, preventing lumps and ensuring a smooth, consistent set. Without this step, you risk having a grainy or uneven texture. Think of it like preparing a canvas before painting; blooming the gelatin sets the stage for the rest of the recipe to succeed. Different types of gelatin can also affect the final outcome. Sheet gelatin, also known as leaf gelatin, is often preferred by professional chefs because it dissolves more cleanly and produces a clearer result. However, powdered gelatin is more readily available and works perfectly well when used correctly. Experimenting with different types and brands can help you find what works best for you and your desired level of silkiness. Don't be afraid to adjust the amount of gelatin slightly to achieve your ideal texture, especially if you live in a very warm climate. Remember, a little extra jiggle is always better than a firm, rubbery panna cotta!
The Key to Silky Texture
So, what exactly makes a Panna Cotta "silky"? It's all about the delicate balance of ingredients and the gentle cooking process. The base of a great Panna Cotta is heavy cream, which provides the richness and luxurious mouthfeel. Whole milk is often added to lighten the cream and prevent the dessert from being too heavy. Sugar provides sweetness and helps to tenderize the gelatin. The key is to heat the cream, milk, and sugar gently over low heat, just until the sugar dissolves. Overheating the mixture can cause the proteins in the cream to denature, resulting in a grainy texture. The bloomed gelatin is then added to the warm cream mixture and stirred until completely dissolved. It's essential to ensure that the gelatin is fully dissolved to avoid any lumps in the final product. Once the mixture is smooth, it's poured into individual ramekins or molds and chilled for at least four hours, or preferably overnight. This allows the gelatin to set properly and the flavors to meld together. The result is a creamy, smooth, and delicate dessert that will impress even the most discerning palate. Achieving that signature silky texture requires patience and attention to detail, but the reward is well worth the effort. A perfectly executed Panna Cotta is a testament to the simple elegance of Italian cuisine.
A Brief History and Myth
The history of Panna Cotta is shrouded in a bit of mystery, with its origins often traced back to the Piedmont region of Italy in the early 20th century. "Panna Cotta" literally translates to "cooked cream," which gives us a clue about its humble beginnings. It's believed that the dessert was inspired by an older, similar dish called "blancmange," a medieval European dessert made with milk or almond milk, sugar, and gelatin. Over time, Italian cooks refined the recipe, using fresh cream from the region's dairy farms and adding their own unique touches. One popular myth surrounding Panna Cotta claims that it was invented by a Hungarian woman living in Piedmont, who adapted a traditional Hungarian cream dessert using local ingredients. While this story is charming, there's little historical evidence to support it. What we do know is that Panna Cotta has evolved from a simple, rustic dessert into a sophisticated and elegant treat enjoyed worldwide. It gained popularity in Italy throughout the 20th century and eventually made its way to international menus, becoming a staple in fine dining restaurants and home kitchens alike. The simplicity of the ingredients and the ease of preparation have contributed to its enduring appeal. Today, Panna Cotta is often flavored with vanilla, coffee, chocolate, or various fruits, reflecting the creativity and adaptability of Italian cuisine. Its rich history and delicate flavor make it a truly timeless dessert.
Unlocking Panna Cotta's Hidden Secrets
The true magic of Panna Cotta lies in its versatility. While the basic recipe is incredibly simple, there are countless ways to customize it to suit your taste preferences. One of the best-kept secrets is infusing the cream with different flavors. For example, you can add a vanilla bean to the cream while it's heating to create a rich, aromatic vanilla Panna Cotta. Or, you can steep coffee beans in the cream for a coffee-infused version. Another secret is experimenting with different types of milk and cream. While heavy cream is the traditional choice, you can use a combination of heavy cream and half-and-half for a lighter dessert. You can even use coconut milk for a vegan version. The possibilities are endless! Another secret is the addition of alcohol. A splash of Amaretto or Frangelico can add a subtle, sophisticated flavor to your Panna Cotta. Just be sure to add the alcohol after the cream has been heated, to prevent it from evaporating. Finally, don't be afraid to play with toppings. Fresh berries, fruit compotes, chocolate sauce, and caramel are all delicious options. The key is to choose toppings that complement the flavor of the Panna Cotta and add a touch of visual appeal. With a little creativity, you can transform a simple Panna Cotta into a truly unforgettable dessert.
Serving Suggestions
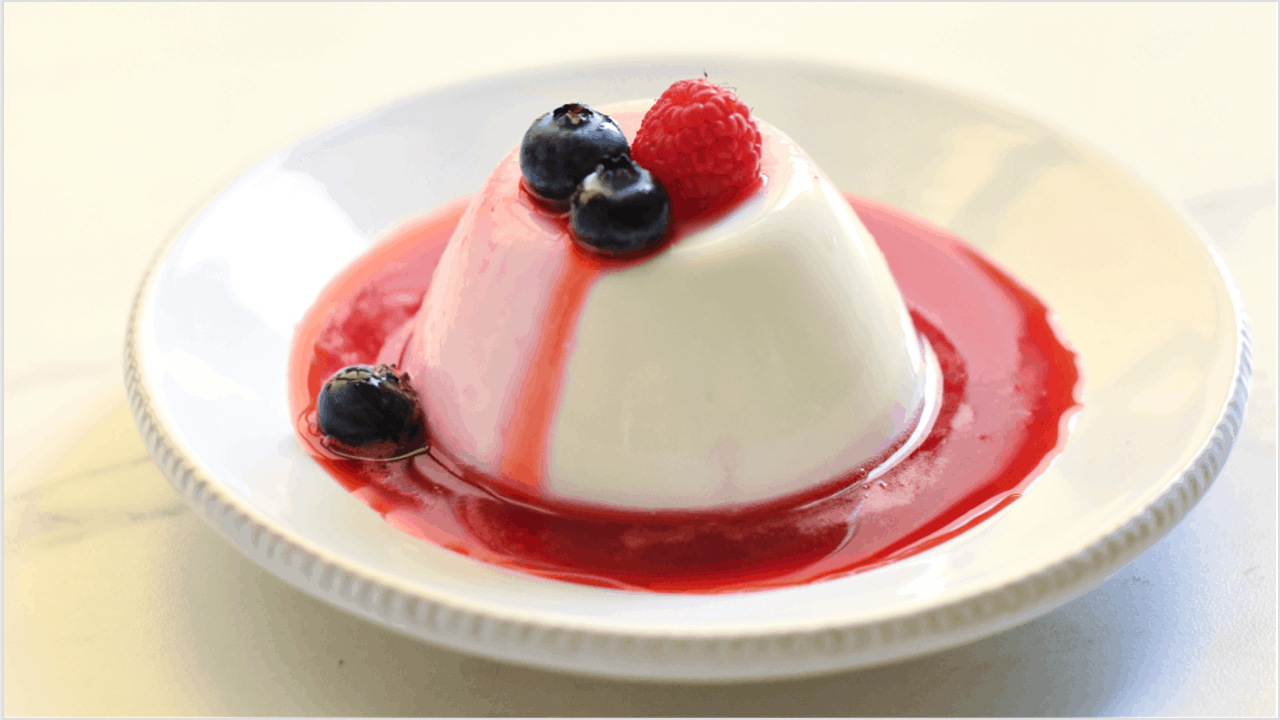
Panna Cotta is a versatile dessert that can be served in a variety of ways. For a classic presentation, serve the Panna Cotta in individual ramekins or small glasses. To unmold the Panna Cotta, gently loosen the edges with a knife and invert it onto a plate. If it doesn't come out easily, dip the bottom of the ramekin in warm water for a few seconds. Serve the Panna Cotta with a simple fruit compote or fresh berries. The acidity of the fruit will balance the richness of the cream. Another popular serving suggestion is to drizzle the Panna Cotta with chocolate sauce or caramel. For a more sophisticated presentation, you can garnish the Panna Cotta with a sprig of mint or a dusting of cocoa powder. Panna Cotta is also delicious served with a crunchy biscotti or almond cookie. The combination of creamy and crunchy textures is a delight. If you're serving Panna Cotta at a dinner party, you can prepare it ahead of time and store it in the refrigerator for up to three days. This will save you time and stress on the day of the event. When serving, be sure to bring the Panna Cotta to room temperature for about 15 minutes to allow the flavors to fully develop. With its elegant presentation and delicious flavor, Panna Cotta is sure to impress your guests.
Tips for Perfect Gelatin Bloom
Achieving the perfect gelatin bloom is crucial for a smooth and silky Panna Cotta. The process involves hydrating the gelatin in cold water, allowing the granules to swell and soften before adding them to the warm cream mixture. This ensures that the gelatin dissolves evenly and prevents lumps from forming. The ideal ratio of gelatin to water is typically around 1 tablespoon of gelatin to 1/4 cup of cold water. When blooming the gelatin, it's important to use cold water, as hot water can cause the gelatin to clump together. Sprinkle the gelatin evenly over the surface of the water and let it sit for about 5-10 minutes, or until the gelatin has absorbed all the water and formed a soft, spongy mass. Once the gelatin is bloomed, it's ready to be added to the warm cream mixture. Make sure the cream mixture is not too hot, as this can also cause the gelatin to clump. Stir the gelatin into the cream mixture until it is completely dissolved. If you're using powdered gelatin, you may need to strain the mixture through a fine-mesh sieve to remove any undissolved particles. If you're using sheet gelatin, squeeze out any excess water before adding it to the cream mixture. By following these tips, you can ensure that your gelatin blooms perfectly every time, resulting in a smooth and silky Panna Cotta.
Troubleshooting Common Panna Cotta Issues
Even with the simplest recipes, occasional hiccups can occur. With Panna Cotta, a few common issues might arise, but don't worry, they're usually easy to fix! One common problem is a Panna Cotta that doesn't set properly. This could be due to not using enough gelatin, or not allowing the gelatin to bloom properly. To fix this, you can gently reheat the Panna Cotta mixture (without boiling it!), add more bloomed gelatin, and chill it again. Another issue is a grainy or lumpy Panna Cotta. This can happen if the cream mixture is overheated, causing the proteins to denature, or if the gelatin isn't fully dissolved. To prevent this, heat the cream mixture gently over low heat and make sure the gelatin is completely dissolved before pouring it into the ramekins. If you encounter lumps, you can try straining the mixture through a fine-mesh sieve. Sometimes, Panna Cotta can develop a skin on top while chilling. This is usually just a cosmetic issue and doesn't affect the taste. To prevent it, you can cover the ramekins with plastic wrap, pressing it gently against the surface of the Panna Cotta. Finally, if your Panna Cotta is too firm, you can reduce the amount of gelatin in the recipe. Remember, a little extra jiggle is always better than a firm, rubbery dessert. By understanding these common issues and how to fix them, you can confidently troubleshoot any Panna Cotta problem and create a perfect dessert every time.
Variations: Flavor Infusions and Topping Ideas
The beauty of Panna Cotta lies in its versatility; it’s a blank canvas for flavor exploration! When it comes to flavor infusions, the possibilities are truly endless. You can steep herbs like lavender or rosemary in the cream while it's heating to create a unique, aromatic dessert. Citrus zest, such as lemon or orange, can add a bright, refreshing twist. Spices like cinnamon, cardamom, or nutmeg can bring warmth and depth. For chocolate lovers, cocoa powder or melted chocolate can be added to the cream mixture. Coffee enthusiasts can steep coffee beans or add espresso powder. The key is to experiment and find your favorite flavor combinations. In addition to flavor infusions, toppings can also elevate your Panna Cotta to the next level. Fresh berries are always a classic choice, adding sweetness and acidity. Fruit compotes, such as cherry or raspberry, can add a touch of elegance. Chocolate sauce, caramel, or a sprinkle of nuts can provide a decadent finish. Whipped cream, crumbled cookies, or even a drizzle of honey can add texture and visual appeal. Don't be afraid to get creative and try new things. The goal is to create a dessert that is both delicious and visually stunning. With a little imagination, you can transform a simple Panna Cotta into a culinary masterpiece.
Fun Facts About Panna Cotta
Did you know that Panna Cotta, despite its elegance, is one of the easiest Italian desserts to make? It requires just a few simple ingredients and minimal cooking time, making it a perfect choice for both novice and experienced cooks. Another fun fact is that Panna Cotta is naturally gluten-free, making it a great option for those with dietary restrictions. Unlike many other desserts, it doesn't rely on flour or other gluten-containing ingredients. Panna Cotta is also incredibly versatile when it comes to serving. It can be served in individual ramekins, small glasses, or even unmolded onto a plate. This makes it suitable for both casual and formal occasions. The name "Panna Cotta" literally translates to "cooked cream" in Italian, which perfectly describes the dessert's main ingredient and preparation method. While Panna Cotta is traditionally flavored with vanilla, there are countless variations that incorporate other flavors, such as chocolate, coffee, citrus, and various fruits. Panna Cotta is often compared to other creamy desserts, such as crème brûlée and flan. However, Panna Cotta is unique in that it is not baked and relies solely on gelatin for its set. Panna Cotta has become a popular dessert around the world, appearing on menus in restaurants and cafes in many different countries. Its simple elegance and delicious flavor have made it a truly timeless treat. So, the next time you enjoy a Panna Cotta, take a moment to appreciate its rich history, simple ingredients, and endless possibilities!
How to Make Silky Panna Cotta: Step-by-Step
Let's break down the process of making Silky Panna Cotta into easy-to-follow steps. First, gather your ingredients: heavy cream, whole milk, sugar, vanilla extract, and gelatin. The quality of your ingredients will directly impact the final result, so opt for fresh, high-quality products whenever possible. Next, bloom the gelatin by sprinkling it over cold water and letting it sit for 5-10 minutes until softened. While the gelatin is blooming, combine the heavy cream, whole milk, and sugar in a saucepan. Heat the mixture over low heat, stirring constantly, until the sugar is dissolved. Be careful not to boil the mixture. Once the sugar is dissolved, remove the saucepan from the heat and stir in the vanilla extract and bloomed gelatin. Stir until the gelatin is completely dissolved and the mixture is smooth. If you're using powdered gelatin, you may need to strain the mixture through a fine-mesh sieve to remove any undissolved particles. Pour the mixture into individual ramekins or small glasses. Cover the ramekins with plastic wrap, pressing it gently against the surface of the Panna Cotta. This will prevent a skin from forming on top. Chill the Panna Cotta in the refrigerator for at least four hours, or preferably overnight, to allow it to set completely. Once the Panna Cotta is set, you can unmold it onto a plate or serve it directly in the ramekin. Garnish with fresh berries, fruit compote, chocolate sauce, or any other toppings of your choice. Enjoy your homemade Silky Panna Cotta!
What If... Things Go Wrong?
Even the best cooks encounter mishaps in the kitchen. What if your Panna Cotta doesn't set properly? Don't panic! There are a few possible reasons for this. The most common cause is not using enough gelatin, or not allowing the gelatin to bloom properly. To fix this, you can gently reheat the Panna Cotta mixture (without boiling it!), add more bloomed gelatin, and chill it again. Another possibility is that the cream mixture was not chilled for long enough. Make sure to allow the Panna Cotta to chill in the refrigerator for at least four hours, or preferably overnight, to ensure that it sets completely. What if your Panna Cotta is too firm? In this case, you likely used too much gelatin. To prevent this in the future, reduce the amount of gelatin in the recipe. You can also try serving the Panna Cotta with a sauce or compote to add moisture. What if your Panna Cotta is grainy or lumpy? This can happen if the cream mixture is overheated, or if the gelatin isn't fully dissolved. To prevent this, heat the cream mixture gently over low heat and make sure the gelatin is completely dissolved before pouring it into the ramekins. If you encounter lumps, you can try straining the mixture through a fine-mesh sieve. By understanding these potential issues and their solutions, you can confidently tackle any Panna Cotta problem and create a perfect dessert every time.
Top 5 Reasons to Try This Silky Panna Cotta Recipe
Here's a quick list of reasons why you should absolutely try this Silky Panna Cotta recipe: 1. Simplicity: The recipe requires just a few basic ingredients and minimal cooking time, making it a perfect choice for busy weeknights or last-minute gatherings.
2. Elegance: Panna Cotta is a sophisticated and elegant dessert that is sure to impress your guests. Its smooth, creamy texture and delicate flavor make it a truly special treat.
3. Versatility: Panna Cotta can be customized with a variety of flavor infusions and toppings, allowing you to create a unique and personalized dessert.
4. Gluten-Free: Panna Cotta is naturally gluten-free, making it a great option for those with dietary restrictions.
5. Make-Ahead Friendly: Panna Cotta can be prepared ahead of time and stored in the refrigerator for up to three days, making it a convenient choice for entertaining. These are just a few of the many reasons why you should try this Silky Panna Cotta recipe. With its simple ingredients, elegant presentation, and delicious flavor, it's a dessert that is sure to become a favorite in your household. So, what are you waiting for? Get in the kitchen and start whipping up a batch of this creamy, dreamy dessert today!
Question and Answer
Q: Can I use a substitute for gelatin?
A: Yes, you can use agar-agar powder as a vegetarian alternative to gelatin. However, the texture will be slightly different. Follow the package instructions for the correct amount to use.
Q: How long does Panna Cotta last in the refrigerator?
A: Panna Cotta can be stored in the refrigerator for up to three days. Make sure to cover it tightly with plastic wrap to prevent it from drying out.
Q: Can I freeze Panna Cotta?
A: Freezing Panna Cotta is not recommended, as it can alter the texture and make it grainy.
Q: What are some good topping ideas for Panna Cotta?
A: Fresh berries, fruit compotes, chocolate sauce, caramel, and a sprinkle of nuts are all delicious topping options for Panna Cotta.
Conclusion of Silky Panna Cotta Recipe: Italian Elegance Made Simple
In conclusion, creating a Silky Panna Cotta is easier than you might think! This recipe offers a simple and straightforward approach to achieving that perfect, creamy texture. With just a few basic ingredients and careful attention to detail, you can impress your friends and family with this elegant Italian dessert. Remember the key steps: properly blooming the gelatin, heating the cream mixture gently, and chilling the Panna Cotta for the appropriate amount of time. Don't be afraid to experiment with different flavor infusions and toppings to create your own unique variations. Whether you're a seasoned baker or a kitchen novice, this recipe is designed to be foolproof and deliver consistently delicious results. So, embrace the simplicity and elegance of Panna Cotta, and enjoy the sweet taste of Italian tradition!

Post a Comment
Post a Comment