5 Danish Pastry Recipes for European Bakery Treats


Imagine biting into a flaky, buttery pastry, its delicate layers shattering in your mouth, revealing a sweet, creamy filling. That's the magic of Danish pastries, a cornerstone of European baking. Ready to unlock the secrets to these delightful treats?
Many home bakers dream of creating those perfect, golden-brown Danish pastries found in bakeries. But often, they are met with dough that’s too dense, fillings that leak, or a lack of that signature flaky texture. Finding reliable recipes and mastering the techniques can feel overwhelming.
This article will guide you through five authentic Danish pastry recipes, perfect for bringing the taste of a European bakery right into your own kitchen. We'll explore classic variations, offering step-by-step instructions and helpful tips to ensure your success. Get ready to impress your friends and family with your newfound baking skills!
We’ve covered a journey through five delectable Danish pastry recipes, uncovering the secrets to achieving flaky layers, creamy fillings, and that irresistible golden-brown hue. From the classic Spandauer to the cinnamon-spiced Kanelsnegle, you now have the tools and knowledge to create authentic European bakery treats at home. These recipes showcase the versatility of Danish pastry dough, allowing for endless variations and creative fillings. Keywords include Danish pastry, European bakery, Spandauer, Kanelsnegle, pastry dough, baking recipes, flaky pastry, and creamy fillings.
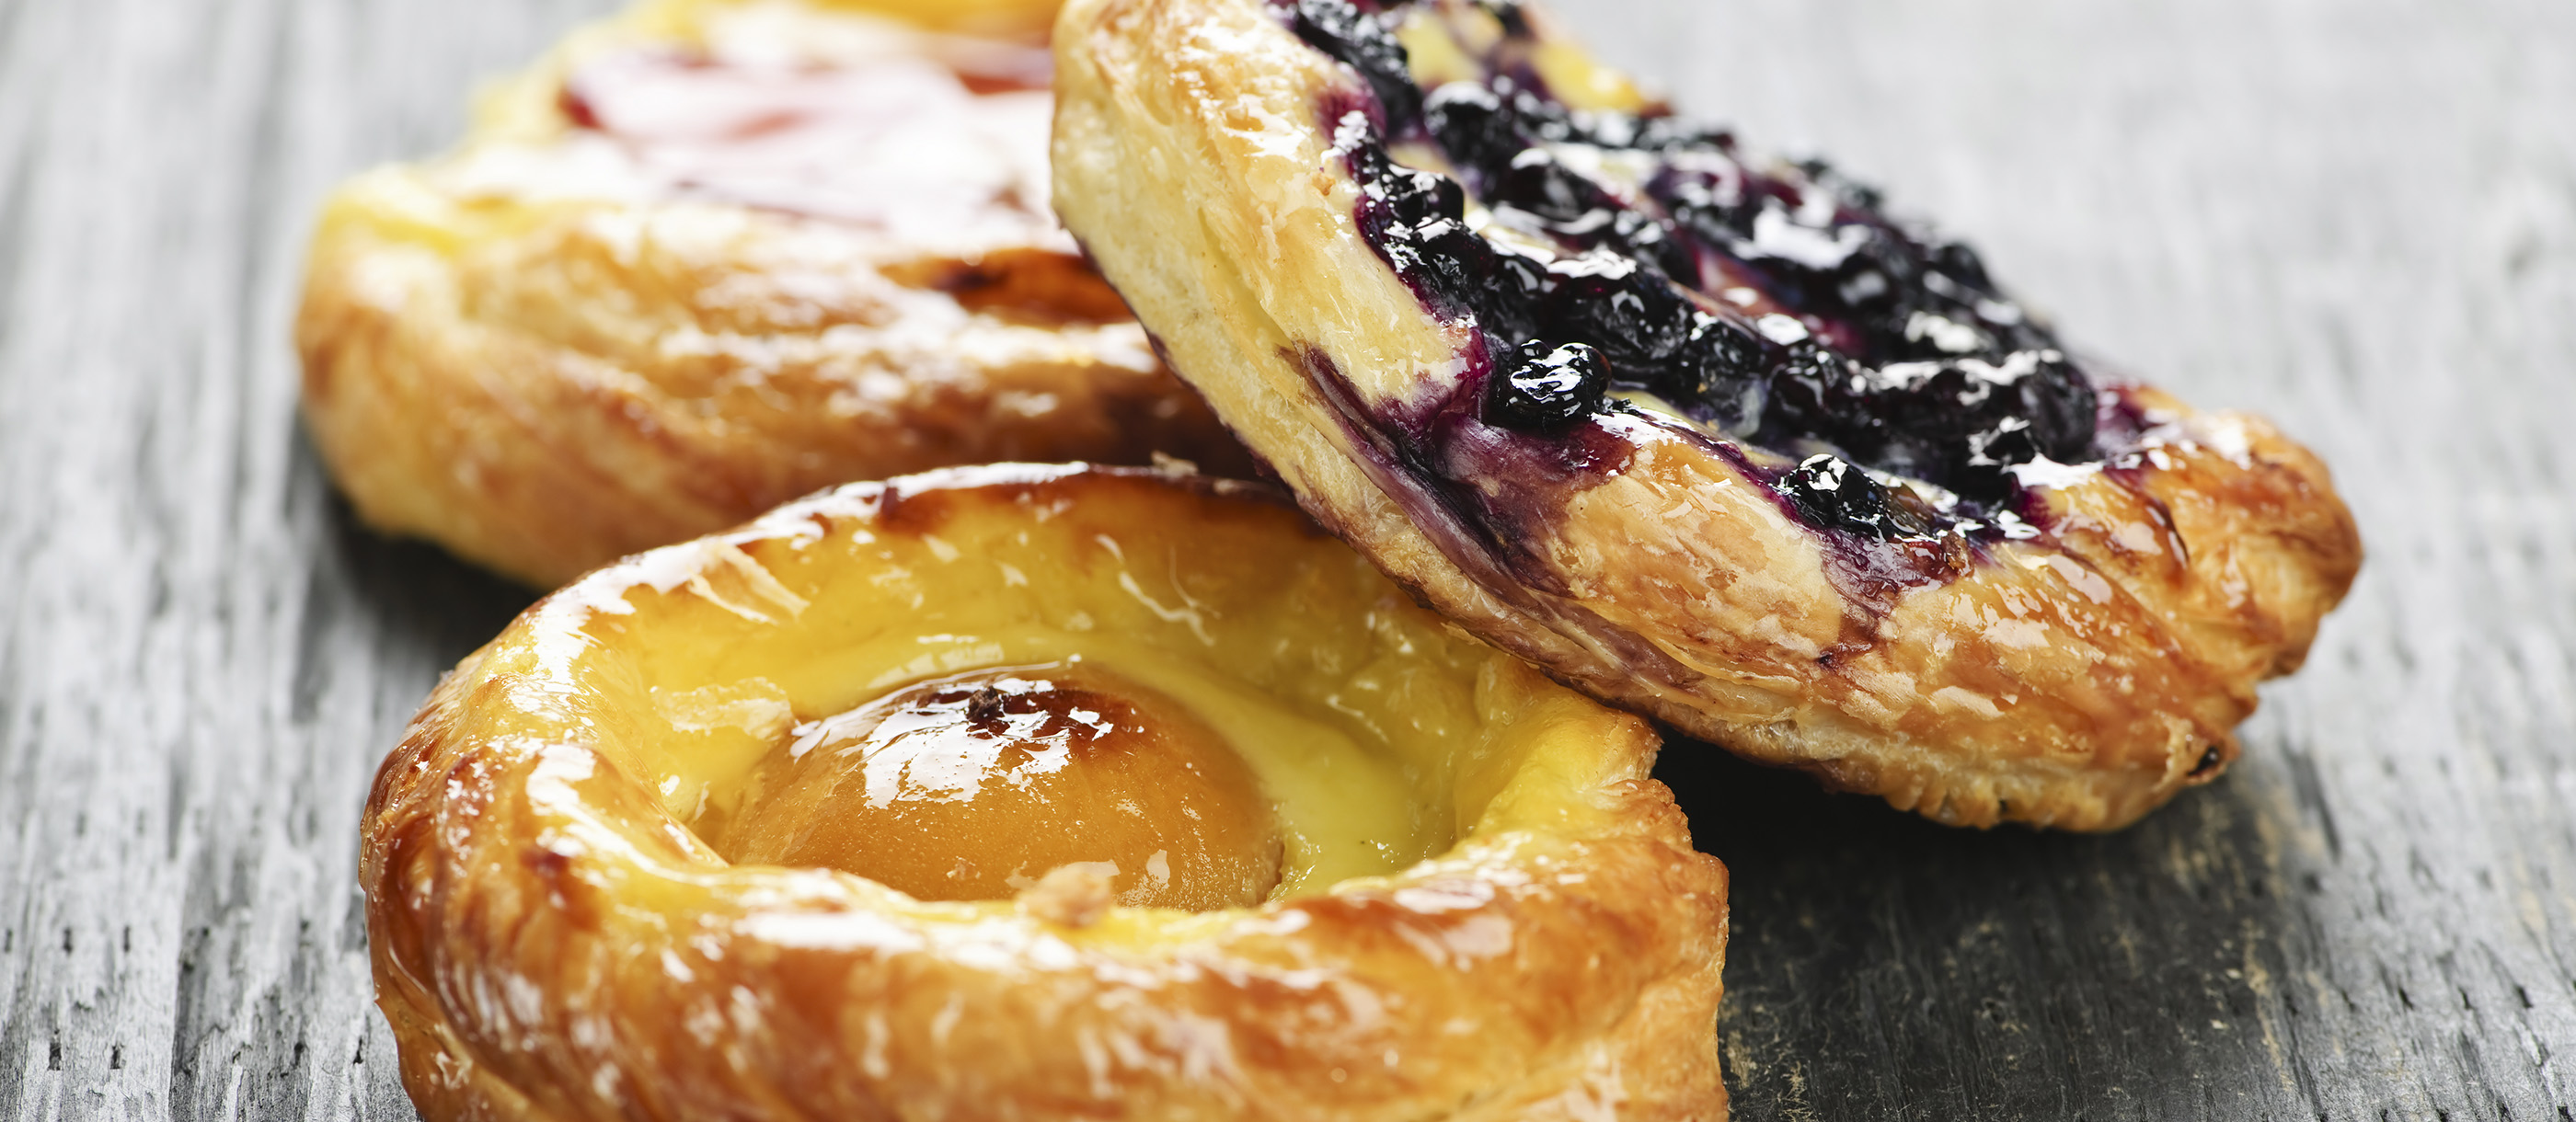
The Allure of the Spandauer
The Spandauer, with its signature custard filling and often a touch of jam, holds a special place in my heart. I remember the first time I tried to make them. The dough was a disaster – tough and unyielding. The custard curdled, and the jam bubbled over, creating a sticky mess. Discouraged, I almost gave up. But I was determined to conquer this iconic pastry. I researched different techniques, experimented with various recipes, and slowly, painstakingly, began to improve. The key, I discovered, was patience and precision. The lamination process, where butter is repeatedly folded into the dough, is crucial for achieving those signature flaky layers. Getting the custard just right requires constant attention and a watchful eye. Now, years later, I can confidently bake a batch of Spandauers that rival any bakery. The satisfaction of creating something so beautiful and delicious from scratch is truly rewarding. These pastries are perfect for a weekend brunch or a special occasion, and they always bring a smile to the faces of those who enjoy them. Spandauers are more than just pastries; they're a testament to the power of persistence and the joy of baking. From mastering the lamination process to perfecting the custard filling, each step is a learning experience that ultimately leads to a truly satisfying result. The aroma that fills the kitchen as they bake, the golden-brown crust, and the creamy, sweet filling all combine to create a sensory experience that is truly unforgettable. And the best part? Sharing these delicious creations with friends and family, knowing that you've put your heart and soul into every single bite. This process, from failure to triumph, taught me not just about baking, but about resilience and the importance of never giving up on a dream.
What Defines a True Danish Pastry?
At its core, a true Danish pastry is all about the dough. Known as "Wienerbrød" in Danish, meaning "Vienna bread," this dough is a laminated pastry, similar to puff pastry or croissant dough. The process of lamination involves repeatedly folding butter into the dough, creating hundreds of thin layers that separate and puff up during baking. This is what gives Danish pastries their signature flaky and airy texture. The quality of the butter is also crucial; high-fat European-style butter is preferred for its rich flavor and ability to create distinct layers. But it's not just the dough that makes a Danish pastry special. The fillings are equally important, and they can range from sweet to savory. Common fillings include custard, fruit jams, cream cheese, marzipan, and nuts. The pastries are often topped with a glaze or icing, adding an extra touch of sweetness and visual appeal. What sets Danish pastries apart from other laminated pastries is their versatility. They can be shaped into a variety of forms, from the classic square or pinwheel to more elaborate designs like braids or crowns. This allows for endless creativity in the kitchen, making each pastry a unique work of art. Whether you're enjoying a simple Spandauer or a more elaborate Kanelsnegle, you're experiencing the culmination of centuries of baking tradition. The combination of flaky dough, flavorful fillings, and beautiful presentation makes Danish pastries a truly special treat.
The History and Myths Behind Danish Pastries
The history of Danish pastries is intertwined with both fact and folklore. While they are known as "Danish" pastries around the world, they actually originated in Vienna, Austria. In the mid-19th century, Danish bakers went on strike, and Austrian bakers were brought in as replacements. These Austrian bakers introduced their laminated pastry techniques to Denmark, and the pastries quickly gained popularity. Over time, Danish bakers adapted the recipes, adding their own unique twists and fillings. One popular myth is that the first Danish pastry was created accidentally when a baker left a block of butter on top of a dough, and the butter melted and created layers. While this is a charming story, it is likely an exaggeration. The lamination process is a deliberate and carefully controlled technique that requires precision and skill. However, the myth highlights the importance of butter in creating the flaky texture of Danish pastries. Regardless of their exact origins, Danish pastries have become a beloved part of European baking culture. They are enjoyed in cafes and bakeries around the world, and they are often associated with special occasions and celebrations. The enduring popularity of Danish pastries is a testament to their delicious taste and appealing presentation. From their humble beginnings in Vienna to their worldwide recognition as a Danish specialty, these pastries have a rich and fascinating history.
Unveiling the Hidden Secrets of Perfect Lamination
The secret to truly exceptional Danish pastries lies in the lamination process. It's not just about folding butter into dough; it's about understanding the science behind it. The goal is to create hundreds of paper-thin layers of butter and dough that will separate and puff up when baked. This requires precise temperature control, careful handling, and a good understanding of how gluten develops in the dough. One hidden secret is to keep both the dough and the butter consistently cold throughout the lamination process. This prevents the butter from melting into the dough, which would result in a greasy and dense pastry. Another important tip is to rest the dough in the refrigerator between each fold. This allows the gluten to relax, making the dough easier to work with and preventing it from becoming too tough. The number of folds also affects the final result. Too few folds will result in fewer layers, while too many folds can make the dough too dense. A general rule of thumb is to do three to four single folds or two to three double folds. Finally, the baking temperature is crucial. A hot oven (around 400°F or 200°C) is needed to create steam, which will cause the layers to separate and puff up. Mastering the lamination process takes practice and patience, but the results are well worth the effort. Once you've mastered the art of lamination, you'll be able to create Danish pastries that are light, flaky, and utterly irresistible. It transforms a simple dough into a symphony of textures and flavors. Each layer, a testament to the baker's skill and attention to detail, contributes to the overall experience.
Recommendations for the Aspiring Danish Pastry Baker
If you're eager to embark on your Danish pastry baking journey, here are a few recommendations to help you succeed. First, invest in high-quality ingredients. As mentioned earlier, European-style butter with a high fat content is essential for creating flaky layers. Use fresh, unbleached flour for the best texture. For fillings, choose ripe, flavorful fruits and premium-quality jams. Second, don't be afraid to experiment with different fillings and flavors. While classic fillings like custard and fruit are always a good choice, you can also try more adventurous combinations. Consider adding spices like cardamom or cinnamon to the dough for extra warmth. Use nuts like almonds or hazelnuts for a crunchy texture. And don't be afraid to get creative with your toppings – a simple glaze or a dusting of powdered sugar can make a big difference. Third, start with a simple recipe and gradually work your way up to more complex ones. The Spandauer is a great starting point, as it's relatively easy to make and requires minimal shaping. Once you've mastered the basics, you can move on to more challenging pastries like the Kanelsnegle or the kringle. Finally, be patient and persistent. Baking Danish pastries can be a challenging process, especially when you're first starting out. Don't get discouraged if your first few attempts aren't perfect. Keep practicing, and you'll eventually master the art of lamination and create beautiful, delicious pastries that rival any bakery. The key is to enjoy the process, learn from your mistakes, and never stop experimenting. With a little practice and a lot of passion, you'll be able to create Danish pastries that are truly your own.
Danish Pastry Dough: A Deep Dive
Danish pastry dough, often called "Wienerbrød" dough, is a type of laminated dough enriched with butter and sometimes eggs. The lamination process, where butter is repeatedly folded into the dough, creates hundreds of thin layers that separate and puff up during baking, resulting in a flaky and airy texture. The key to successful lamination is maintaining a consistent temperature for both the dough and the butter. The butter should be cold and pliable, but not too hard, as this can cause it to break through the dough. The dough should also be kept chilled to prevent the gluten from developing too quickly. The dough typically includes flour, water or milk, yeast, sugar, salt, and butter. Some recipes also call for eggs or egg yolks, which add richness and color. The yeast is responsible for leavening the dough, while the sugar provides food for the yeast and adds sweetness. Salt controls the yeast activity and enhances the flavor. The butter, of course, is the star of the show, creating the signature flaky layers. There are different methods for laminating dough, but the most common is the "French" method, where the butter is placed inside the dough and folded in. Another method is the "English" method, where the butter is layered between sheets of dough. The number of folds and the resting time between folds also affect the final result. The dough can be used to make a variety of pastries, including Spandauers, Kanelsnegles, kringles, and croissants. Each pastry has its own unique shape and filling, but they all share the same flaky, buttery texture. Mastering the Danish pastry dough is the key to unlocking a world of delicious European bakery treats. It's a process that requires patience, precision, and a love for baking.
Essential Tips for Baking Perfect Danish Pastries
Achieving bakery-worthy Danish pastries at home requires attention to detail and a few insider tips. First, use a digital scale to measure your ingredients accurately. Baking is a science, and precise measurements are crucial for consistent results. Second, proof your yeast properly. This ensures that the yeast is active and will leaven the dough effectively. To proof yeast, dissolve it in warm water with a pinch of sugar. If the mixture foams up within a few minutes, the yeast is good to use. Third, knead the dough until it is smooth and elastic. This develops the gluten, which gives the dough its structure. However, be careful not to over-knead the dough, as this can make it tough. Fourth, chill the dough thoroughly between each fold of the lamination process. This allows the gluten to relax and prevents the butter from melting into the dough. Fifth, use a sharp knife or pastry wheel to cut the pastries into their desired shapes. This creates clean edges that will puff up beautifully during baking. Sixth, brush the pastries with an egg wash before baking. This gives them a golden-brown color and a glossy finish. Seventh, bake the pastries at a high temperature (around 400°F or 200°C) to create steam and encourage the layers to separate. Eighth, let the pastries cool completely before glazing or icing them. This prevents the glaze from melting and ensures that the pastries hold their shape. Ninth, store the pastries in an airtight container to keep them fresh. Tenth, don't be afraid to experiment with different fillings and toppings. This is your chance to get creative and create pastries that are truly your own. Remember, baking is a journey, not a destination. Enjoy the process, learn from your mistakes, and never stop experimenting. With a little practice and these essential tips, you'll be baking perfect Danish pastries in no time.
Troubleshooting Common Danish Pastry Problems
Even experienced bakers sometimes encounter challenges when making Danish pastries. Let's address some common issues and how to fix them. If your dough is too tough, it may be due to over-kneading or not chilling it sufficiently between folds. Avoid over-kneading by using a stand mixer on low speed or kneading by hand for a shorter period. Ensure adequate chilling time (at least 30 minutes) between each fold to relax the gluten. If the butter is leaking out during baking, it could be because the butter was too warm during lamination. Make sure the butter is cold and pliable before folding it into the dough. You can also try freezing the dough for a few minutes before baking to solidify the butter. If the pastries are not rising properly, the yeast may be inactive or the oven temperature may be too low. Check the expiration date on your yeast and proof it before using it. Make sure your oven is properly preheated to the correct temperature. If the filling is too runny, it may be due to using too much liquid or not thickening it sufficiently. Use a thickening agent like cornstarch or flour to achieve the desired consistency. If the pastries are burning on the bottom, the oven rack may be too low. Move the rack to the middle position or place a baking sheet underneath the pastries to protect them from the direct heat. If the pastries are not browning evenly, rotate the baking sheet halfway through the baking time. This ensures that all sides of the pastries are exposed to the same amount of heat. Finally, remember that practice makes perfect. Don't get discouraged if your first few attempts aren't flawless. Keep experimenting and learning, and you'll eventually master the art of Danish pastry baking. Understanding and troubleshooting these common problems will empower you to create consistently delicious results.
Fun Facts About Danish Pastries That Might Surprise You
Beyond their delicious taste, Danish pastries hold some intriguing facts that might surprise you. Did you know that in Denmark, they're actually called "Wienerbrød," meaning "Vienna bread"? This is because the technique for making laminated dough was brought to Denmark by Austrian bakers in the 19th century. Another fun fact is that the most popular Danish pastry in Denmark is the "Spandauer," a square or round pastry filled with custard and often topped with jam. It's a classic treat that can be found in bakeries all over the country. In some parts of the world, Danish pastries are known as "Copenhagen pastries." This is likely due to the association of Denmark with its capital city, Copenhagen. The lamination process, which is key to creating the flaky texture of Danish pastries, can involve hundreds of layers of butter and dough. This requires precision and patience, but the results are well worth the effort. Danish pastries are often enjoyed as a breakfast treat, but they can also be served as a dessert or snack. They pair well with coffee, tea, or milk. The fillings for Danish pastries can be incredibly diverse, ranging from sweet to savory. In addition to classic fillings like custard and fruit, you can also find pastries filled with cream cheese, nuts, chocolate, or even savory ingredients like ham and cheese. Danish pastries have become a symbol of Danish baking culture and are enjoyed around the world. They represent the perfect combination of flaky texture, rich flavor, and beautiful presentation. Exploring these fun facts adds another layer of appreciation for these delightful pastries.
How to Make Your Own Signature Danish Pastry Recipe
Creating your own signature Danish pastry recipe is a rewarding and creative endeavor. Start by mastering the basic dough recipe. Once you're comfortable with the lamination process, you can begin experimenting with different flavors and fillings. Consider incorporating spices like cardamom, cinnamon, or nutmeg into the dough for added warmth and depth. You can also add extracts like vanilla, almond, or lemon for a more pronounced flavor. When it comes to fillings, the possibilities are endless. Think about your favorite flavors and ingredients. Do you love the combination of chocolate and hazelnut? Try filling your pastries with Nutella and chopped hazelnuts. Are you a fan of fruit? Experiment with different types of berries, stone fruits, or tropical fruits. You can also create savory fillings using ingredients like cheese, ham, spinach, or mushrooms. To add visual appeal to your pastries, consider different shaping techniques. You can create classic shapes like squares, triangles, or pinwheels, or you can try more elaborate designs like braids, knots, or crowns. Decorate your pastries with glazes, icings, nuts, seeds, or sprinkles. A simple glaze made from powdered sugar and milk can add a touch of sweetness and shine. Chopped nuts or seeds can provide a crunchy texture and visual interest. Sprinkles can add a pop of color and fun. Don't be afraid to experiment and let your creativity shine. Remember, the key to creating a signature recipe is to find a combination of flavors and techniques that you truly love. Baking is an art, and your signature Danish pastry recipe is your masterpiece. Express yourself through flavors, shapes, and decorations, and create something that is truly unique and delicious.
What If You Could Bake Perfect Danish Pastries Every Time?
Imagine the satisfaction of consistently baking perfect Danish pastries, each one boasting flaky layers, creamy fillings, and a golden-brown hue. What if you could eliminate the guesswork and frustration often associated with laminated dough and create bakery-quality treats in your own kitchen? This level of mastery is attainable with the right knowledge, techniques, and a willingness to practice. By understanding the science behind lamination, you can control the texture and flakiness of your dough. By experimenting with different fillings and flavors, you can create pastries that perfectly suit your tastes. By mastering the art of shaping and decorating, you can transform simple pastries into stunning works of art. The possibilities are endless. Imagine hosting a brunch and serving your guests homemade Danish pastries that rival any bakery. Picture the smiles on their faces as they bite into the flaky layers and savor the delicious fillings. Envision the pride you'll feel knowing that you created these culinary masterpieces from scratch. Baking perfect Danish pastries is not just about following a recipe; it's about developing a deep understanding of the ingredients and techniques involved. It's about cultivating a passion for baking and a desire to create something truly special. It's about transforming simple ingredients into extraordinary treats that bring joy to yourself and others. So, what if you could bake perfect Danish pastries every time? The answer is, you can. With dedication, practice, and a love for baking, you can unlock the secrets to laminated dough and create a world of delicious possibilities.
Listicle of 5 Must-Try Danish Pastry Recipes
Here’s a listicle of five must-try Danish pastry recipes that will transport you to a European bakery:
- Classic Spandauer: This iconic pastry features a square or round shape filled with creamy custard and often topped with a dollop of fruit jam. The flaky layers and sweet filling make it a perfect breakfast or dessert treat.
- Cinnamon Swirls (Kanelsnegle): These delightful pastries are swirled with a fragrant cinnamon filling and glazed with a sweet icing. The warm spices and soft dough create a comforting and irresistible treat.
- Cream Cheese Danish: This rich and decadent pastry features a flaky crust filled with a creamy cheese filling. The combination of textures and flavors is simply divine.
- Fruit-Filled Danish: These pastries are filled with a variety of fresh or dried fruits, such as apples, berries, or apricots. The fruity filling adds a burst of flavor and sweetness to the flaky crust.
- Kringle: This traditional pastry is a long, braided dough filled with nuts, dried fruits, and spices. The intricate design and flavorful filling make it a show-stopping dessert.
These five recipes offer a taste of the diverse and delicious world of Danish pastries. From the classic Spandauer to the festive Kringle, each pastry is a unique and satisfying treat. Whether you're a seasoned baker or a beginner, these recipes are sure to impress. So, gather your ingredients, preheat your oven, and get ready to embark on a delicious baking adventure. Each of these pastries is a testament to the art of laminated dough and the creativity of Danish baking. Experiment with different fillings and toppings to create your own signature versions of these classic treats.
Enjoy the process, savor the flavors, and share your creations with friends and family.
Question and Answer About Danish Pastry Recipes for European Bakery Treats
Q: What is the key to achieving flaky layers in Danish pastries?
A: The key is the lamination process, which involves repeatedly folding cold butter into the dough to create thin layers that separate during baking.
Q: Can I use margarine instead of butter in Danish pastries?
A: While you can, butter is highly recommended for its flavor and ability to create distinct layers. Margarine may not produce the same results.
Q: How do I prevent the filling from leaking out during baking?
A: Ensure that the filling is not too runny and that the pastry is properly sealed before baking. You can also use a slightly thicker filling or add a binding agent like cornstarch.
Q: What is the best way to store Danish pastries?
A: Store them in an airtight container at room temperature for up to 2 days or in the refrigerator for up to 5 days. You can also freeze them for longer storage.
Conclusion of 5 Danish Pastry Recipes for European Bakery Treats
Mastering these five Danish pastry recipes opens a world of delightful European bakery treats you can create at home. From understanding the science of lamination to experimenting with fillings, the journey is as rewarding as the final product. So, embrace the challenge, gather your ingredients, and embark on your own Danish pastry adventure. Happy baking!

Post a Comment
Post a Comment